
Statement Design
The Statement Design tool allows you to customize the appearance of your Pre-Event and Event Statements while maintaining IRS-compliant formatting. You can add, remove, and rearrange statement elements, customize fonts and layout, attach PDFs to statements, and control which statement emails are sent for each payment method.
💡 Good to Know: Statement Design can be found under Settings → Statement Design or Resources.
⚠️ Important: Statements are IRS-compliant by default and can be used without making any changes. If you customize your statement, avoid removing required tax-related elements such as the Tax Statement and EIN.
Statement Elements (Left Panel)
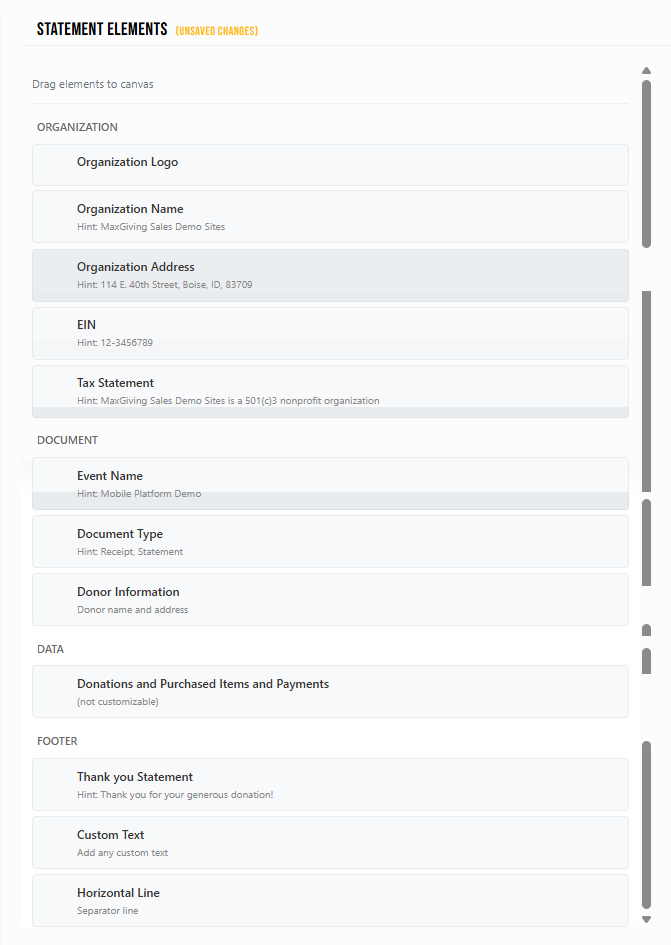
The left panel contains all available elements that can be added to your statement. Drag elements from this panel onto the canvas.
**Unsaved Changes Indicator
When changes are made, an Unsaved Changes indicator appears at the top.
Add and Organize Statement Elements
Elements are grouped by category.
-
Organization Elements: Displays your organization’s information.
- Organization Logo
- Organization Name
- Organization Address
- EIN
- Tax Statement
-
Document Elements
- Event Name
- Document Type (Receipt or Statement)
- Donor Information (donor name and address)
-
Data Elements: Displays the guest’s transaction details.
- Donations and Purchased Items and Payments (not customizable)
-
Footer Elements: Used for closing messaging and visual separation.
- Thank You Statement
- Custom Text
- Horizontal Line
Adding Elements to the Canvas (Center)
- Click and drag an element from the left panel
- Drop it onto the canvas
The element will appear on the statement layout.

Rearranging Elements
- Drag elements up or down within the canvas to change their order
Removing Elements
- To remove an element click on it and drag it back to the list on the left hand side or click the Red Delete at the bottom of the Element Properties section.
Editing Elements (Right Panel)
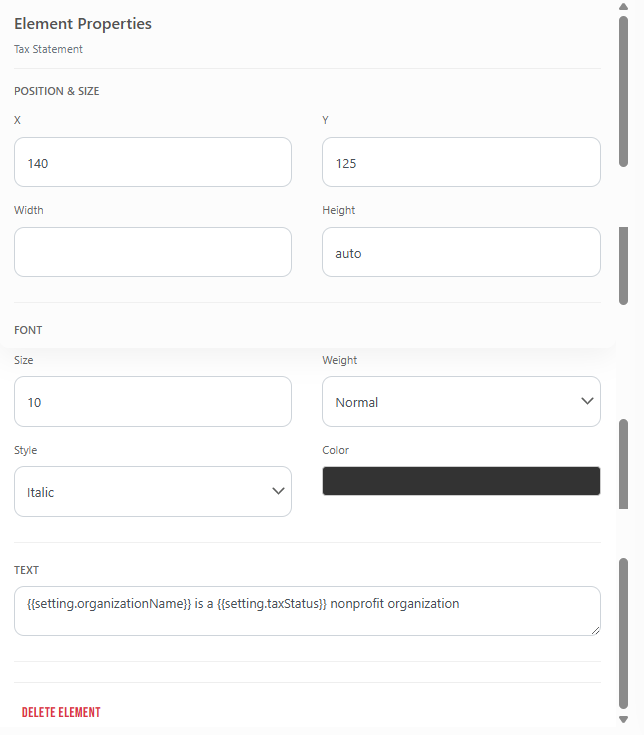
When you click an element on the canvas, its settings appear in the Element Properties panel on the bottom of the right section.
-
Position & Size
- X – Horizontal position
- Y – Vertical position
- Width – Fixed width (optional)
- Height – Height of element (Auto by default)
Tip: Leaving Width and Height blank or set to Auto allows natural sizing.
-
Font Settings
- Size – Font size
- Weight – Normal or Bold
- Style – Normal, Italic, etc.
- Color – Text color
-
Editing Text Content Elements such as:
- Thank You Statement
- Custom Text: Allow you to type your own wording.
Reset to Default
- Click Reset to Default to restore the original statement layout
Previewing Your Statement
- Click Preview PDF to see how the statement will look when printed or downloaded
Saving Your Layout
- Review your layout
- Click Save
Changes are not applied until saved.
Good to Know
- You control which elements appear and their order
- Data element content cannot be edited, but placement can be moved
- Font and styling changes apply only to the selected element
Statement Attachments & Send Preferences

This section allows you to attach PDFs to statements and control what type of statement emails are sent based on payment method.
1. Event Statement Attachment
- Click Upload PDF to attach a document to event statement emails
- This PDF will be included with all event-related statements sent to guests
- Pre-Event Statement Attachment
- Click Upload PDF to attach a document to pre-event statement emails
- Useful for sharing event details, instructions, or additional information before the event
Statement Send Preferences
Choose what type of email is sent when a payment is recorded on the dashboard.
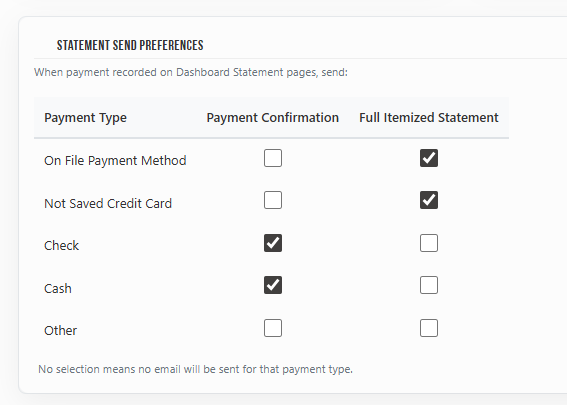
- For each payment type, you can select:
- Payment Confirmation
- Full Itemized Statement
-
Payment Types
- On File Payment Method
- Not Saved Credit Card
- Check
- Cash
- Other
How It Works
- Check the box under Payment Confirmation to send a basic receipt
- Check the box under Full Itemized Statement to send a detailed statement
- If no option is selected for a payment type, no email will be sent
💡 Good to Know
- Settings can be customized for each payment type independently
- Attachments will be included in the corresponding statement emails
⚠️ Important
Always click Save after making changes.
Printable Quick Help Guide:
(see below for printing instructions)

How to Print This Guide
- Right-click on the image of the guide
- Select Save Image As…
- Save the file to your computer
- Open the saved image
- Click Print (or use Ctrl + P / Command + P)
💡 Good to Know
For best results, print using Full Page or Fit to Page settings to ensure proper sizing and clarity.