
General Settings Full Set Up
General Event Settings
With an Admin login, open General Event Settings from the Event Management section of the left-hand dashboard menu.
This page contains three tabs:
- General Settings
- Advanced Settings
- Statement Design
A. General Settings

Organization & Event Information

This section contains the core information for both your organization and your event. All fields (including logo) must be completed if you plan to send statements from this site.
Information entered here is also used throughout the site, including text messages, emails, and transaction receipts. The contact phone number entered is what bidders will use if they need assistance.
Fields
- Organization Name – Legal name of the organization
- Event Name – Name of the event
- Contact Phone – Phone number guests should use for questions
-
Contact Email – Email address supporters will see and receive correspondence from
Tax ID – Tax ID used for software purchase and merchant account
Tax Status – 501(c)(3), 501(c)(4), or Other
Address – Organization’s physical address
Organization Logo – Logo displayed on receipts
- Upload instructions: https://maxgiving.helpscoutdocs.com/article/43-adding-photos-or-videos-to-your-site
- Organization Weblinks – Website and social links
Design Settings

Design Settings allow you to choose how your event colors are applied and preview how they will look before saving. You may select from Choose a Theme, Use My Brand Color, or Custom Colors, and choose between Light or Dark background styles within each option.
Choose a Theme (Palette)

Provides curated color combinations with Light and Dark variations.
Includes
- Coordinated colors for backgrounds, buttons, accents, and text
Steps
- Select Choose a Theme
- Choose Light or Dark under Background Style
- Browse available palettes
- Click a palette to view its color selection
- Selected palette becomes highlighted and preview appears at the top
- Click Save
Good to Know
- Switch between Light and Dark styles
- Click multiple palettes to preview
- Nothing is applied until you click Save
Use My Brand Color

Uses one of your organization’s brand colors to generate a full site palette.
Steps
- Select Use My Brand Color
- Choose Light or Dark under Background Style
-
Enter hex code in Enter Your Brand/Corporate Color
or choose from color picker
- Click Generate Palette
- Click Apply This Palette to preview
- Click Save
Good to Know
- Palette is generated from a single starting color
- Change starting color and regenerate anytime
- Nothing is applied until you click Save
Custom Colors

Manually control individual colors using a Light or Dark base style.
You Can Customize
- Main Color
- Secondary Color
- Background Color
Steps
- Select Custom Colors
- Click any color field
- Choose color, adjust hue/saturation, or enter hex code
- Preview in field
- Repeat as needed
- Click Save
Good to Know
- Color sliders allow fine tuning
- Nothing is applied until you click Save
Previewing Your Choices

- Preview palettes, Light/Dark styles, and colors before saving
- Explore multiple combinations
- Only saved selections apply
Event Banner

Enter width and height values to control banner size. **For best results, make sure your banner graphic is sized to match your entered dimensions to prevent stretching or pixelation.
Click Save when finished.
Site Welcome Message


1. Optional text field to personalize your site.
Fundraising Goal (Thermometer)

Displays fundraising progress.
Thermometer Goal
- Enter whole dollar amount (no commas)
- Blank or $0 hides thermometer
Thermometer Displays
- All Fundraising Revenue
- Auction bids, item sales, donations
- Displays on all pages
- Donations Only
- Donations only
- Optional checkbox to include ticketing/sponsorship revenue
QR Code Generator

The QR Code Generator allows you to quickly create downloadable QR codes that link directly to specific pages of your event site. These QR codes are perfect for signage, programs, table tents, emails, and printed materials.
What This Does
Generates a QR code that sends guests to a selected landing page within your event site.
A live preview of the QR code is displayed before downloading.
Fields
-
Destination
Displays the full URL that the QR code will point to.
-
Landing Page
Dropdown menu used to select which page of your event site the QR code should link to (for example: Home, About Us, Donate, Register, Auction, etc.).
How to Generate a QR Code
- Select the desired page from the Landing Page dropdown
- Confirm the Destination URL updates correctly
- Review the QR code preview
- Click Download QR Code
Good to Know
- Changing the Landing Page automatically updates the QR code
- You can generate multiple QR codes for different pages
- Downloaded QR codes can be resized for printing without affecting functionality
***Important
Design changes are not applied automatically.
You must click Save at the bottom of the page.
B. Advanced Settings

Formal Titles

When enabled, prefixes stored in guest records will appear on printed materials.
Donation Support Fee

Optional fee used to help offset event costs. This amount is processed as an additional donation to the organization and earmarked as a fee.
Options
- Required
- Applied automatically
-
Choose All Auction Activity or Items Only
Optional Donation
-
Guest chooses whether to accept
None
- No fee applied
Fee Percentage
- Enter percentage
- Required if using Required or Optional
All Fundraising Activity
- Default unless None is chosen
Customize Event Tabs

Rename the Item Sales tab.
Sales Tax

Create one or more tax rates to apply to auction items and/or items for sale.
Fields
- Tax Rate Name – Label for the tax
- Tax Rate Percent – Percentage to be charged
- Applies To – Selected Items
- Based On – Bid Price or Value
To add a Tax level:
- Click Add Tax
- Enter a name in the Tax Rate Name field
- Enter the percentage in the Tax Rate Percent field
- Choose how the tax should be applied using the radio buttons
- Click Add Tax
Once added, tax rates appear in a list where you can Edit or Delete them.
Good to Know
Taxes are assigned at the item level.
Buyer’s Premium

A Buyer’s Premium is an additional percentage added to the winning bid or purchase price of an item.
Fields
-
Buyer’s Premium Percentage – Percentage added to the item price
Applies To – Select whether the premium applies to:
- Auction Items Only
- Auction Items and Item Sales
To add a Buyer's Premium:
- Enter the percentage in the Buyer’s Premium Percentage field
Good to Know
- The Buyer’s Premium is calculated automatically
- The premium appears as a separate line item for the guest
- A value of 0% disables the Buyer’s Premium
Include Custom Footer on Guest Statements

Add custom text to guest statements. **You do not need to include tax information here this is already included on the standard statement.
C. Statement Design
Statements are IRS-compliant by default and can be used exactly as they are.
Customizing your statement layout is optional and intended only to improve visual presentation or match your branding. No changes are required to maintain IRS-compliant statements.

The Statement Design tab allows you to customize the layout and content of guest statements and receipts. You can choose which elements appear, control their order, adjust styling, and add custom messaging.
Important: If you choose to customize, avoid removing required tax-related elements such as the Tax Statement or EIN.
Unsaved Changes Indicator
[Screenshot: Unsaved Changes message]
When changes are made, an Unsaved Changes indicator appears at the top.
Statement Elements (Left Panel)
The left panel contains all available elements that can be added to your statement. Drag elements from this panel onto the canvas.

Elements are grouped by category.
-
Organization Elements: Displays your organization’s information.
- Organization Logo
- Organization Name
- Organization Address
- EIN
- Tax Statement
-
Document Elements
- Event Name
- Document Type (Receipt or Statement)
- Donor Information (donor name and address)
-
Data Elements: Displays the guest’s transaction details.
- Donations and Purchased Items and Payments (not customizable)
-
Footer Elements: Used for closing messaging and visual separation.
- Thank You Statement
- Custom Text
- Horizontal Line
Adding Elements to the Canvas (Center)
- Click and drag an element from the left panel
- Drop it onto the canvas
The element will appear on the statement layout.
Rearranging Elements
- Drag elements up or down within the canvas to change their order
Removing Elements
- To remove an element click on it and drag it back to the list on the left hand side or click the Red Delete at the bottom of the Element Properties section.
Editing Elements (Right Panel – Element Properties)
When you click an element on the canvas, its settings appear in the Element Properties panel on the bottom of the right section.

-
Position & Size
- X – Horizontal position
- Y – Vertical position
- Width – Fixed width (optional)
- Height – Height of element (Auto by default)
Tip: Leaving Width and Height blank or set to Auto allows natural sizing.
-
Font Settings
- Size – Font size
- Weight – Normal or Bold
- Style – Normal, Italic, etc.
- Color – Text color
-
Editing Text Content Elements such as:
- Thank You Statement
- Custom Text: Allow you to type your own wording.

Reset to Default
- Click Reset to Default to restore the original statement layout
Previewing Your Statement
- Click Preview PDF to see how the statement will look when printed or downloaded
Saving Your Layout
- Review your layout
- Click Save
Changes are not applied until saved.
Good to Know
- You control which elements appear and their order
- Data element content cannot be edited, but placement can be moved
- Font and styling changes apply only to the selected element
Statement Attachments & Send Preferences

This section allows you to attach PDFs to statements and control what type of statement emails are sent based on payment method.
1. Event Statement Attachment
- Click Upload PDF to attach a document to event statement emails
- This PDF will be included with all event-related statements sent to guests
- Pre-Event Statement Attachment
- Click Upload PDF to attach a document to pre-event statement emails
- Useful for sharing event details, instructions, or additional information before the event
Statement Send Preferences
Choose what type of email is sent when a payment is recorded on the dashboard.
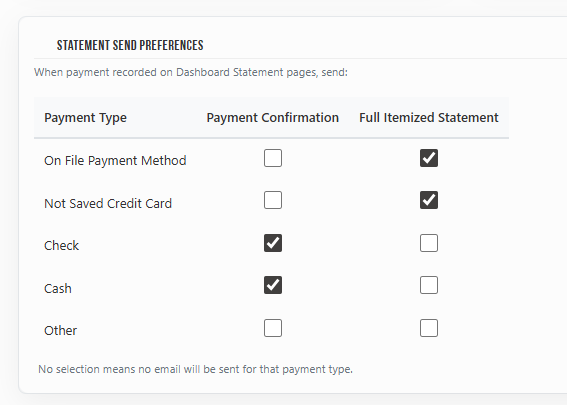
- For each payment type, you can select:
- Payment Confirmation
- Full Itemized Statement
-
Payment Types
- On File Payment Method
- Not Saved Credit Card
- Check
- Cash
- Other
How It Works
- Check the box under Payment Confirmation to send a basic receipt
- Check the box under Full Itemized Statement to send a detailed statement
- If no option is selected for a payment type, no email will be sent
💡 Good to Know
- Settings can be customized for each payment type independently
- Attachments will be included in the corresponding statement emails
⚠️ Important
Always click Save after making changes.