
New Check -Out Screen
The Guest Check Out screen provides one place to manage a guest’s purchases, balances, payment methods, and payments during an event. It can be used for end-of-event checkout or throughout the event to quickly add purchases and process payments. check out
💡 Good to Know: The Guest Check Out screen can be accessed from Guests & Bidders by clicking the dollar sign in a circle icon for the guest.
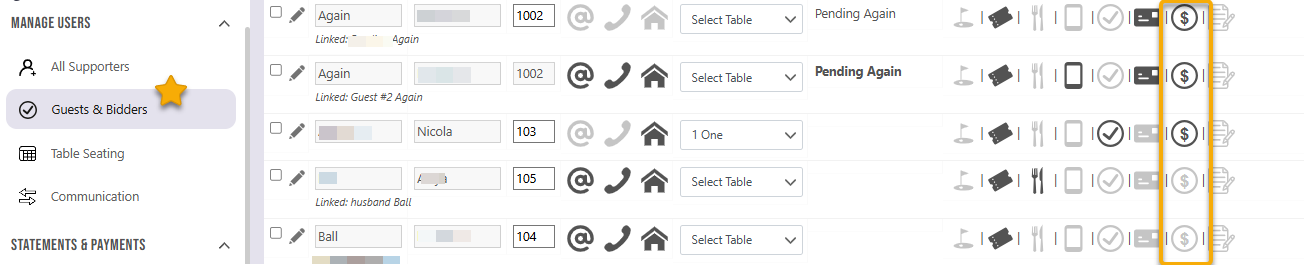
Guest Check Out Icon
The Guest Check Out icon provides quick snapshot of a guest’s purchases and payments in one screen and can also help identify guests with outstanding balances.
From Guests & Bidders:
- Locate the guest.
- Find the dollar sign in a circle icon.
- Click the icon to open the Guest Check Out screen.
💡 Good to Know: The appearance of the checkout icon can help you identify a guest's balance status. A darkened icon indicates an outstanding event balance. However, a guest may still have a Pre-Event balance even when the icon is not darkened.
⚠️ Important: Always confirm you have opened the correct guest before making changes or processing a payment.
Guest Information
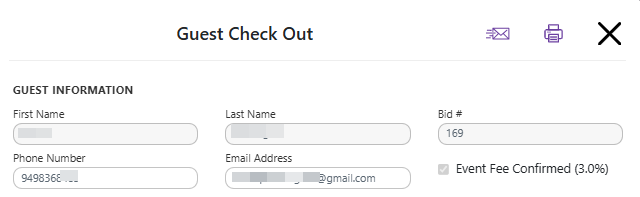
The Guest Information section displays the guest’s contact and event information.
From this section you can review and/or update the guest's:
- First Name.
- Last Name.
- Phone Number.
- Email Address.
- Bid #.
- Event Fee conformation.
Email or Print the Guest Statement
The icons at the top of the Guest Check Out screen allow you to provide the guest with a copy of their statement.
From here you can:
- Click the Email icon to email the guest's event statement.
- Click the Print icon to print a copy of both event and pre-event statement.
The email option allows you to customize the outgoing email that will accompany the guest's statement.
Action Buttons

Additional Purchases
Additional purchases and contributions can be added directly from the checkout screen.
Using one of these 3 buttons you can:
- Add Donation.
- Add Item Sale.
- Add Auction Item.
This can be especially helpful for last-minute event activity, such as adding raffle tickets, merchandise, centerpieces, additional donations, or other purchases while the guest is checking out. check out
Pre-Event Balance
If the guest has an outstanding Pre-Event balance, it is displayed separately from their Event balance. However, you can add this amount to the event statement allowing you to charge the card once for both outstanding payments.
Below the the button you will see the amount of the pre-event outstanding balance and any fees that there may be.
Add a Pre-Event Balance to Checkout
- Review the Pre-event unpaid balance displayed under Guest Payments.
- Hover over the balance to review the purchases or charges that make up the outstanding amount.
- Click Add Pre-Event Amount button.
- Review the updated checkout total.
- Continue with payment when ready.
💡 Good to Know: Pre-Event purchases are not displayed in the Guest Purchases section of the checkout screen. To see the purchases associated with an outstanding Pre-Event balance, hover over the Pre-event unpaid balance.
💡 Good to Know: The Add pre-event button will only show if the guest has an outstanding pre-event balance.
⚠️ Important: A guest can have a Pre-Event balance even if they do not currently have an Event balance. Always review both balances before completing checkout.
Process a Payment
The Pay button displays the amount currently available to be paid through checkout.
To process a payment:
- Review the guest’s purchases and balances.
- Add any outstanding Pre-Event balance that should be included in the payment.
- Click Pay button.
In the Payment Processing popup:
- Enter or confirm the amount being paid.
- Select whether the payment will be processed now or recorded as a Payment Pending.
- Select the payment type:
- Credit Card
- Cash
- Check
- Other
- Enter any additional payment information required for the selected payment type.
- Complete the payment.
Payments can be processed for the full balance or a partial amount. A partial payment can also be recorded as pending when part of the balance will be paid later.
⚠️ Important: Confirm the payment amount and payment method before completing the transaction, especially when processing partial or pending payments.
Guest Purchases
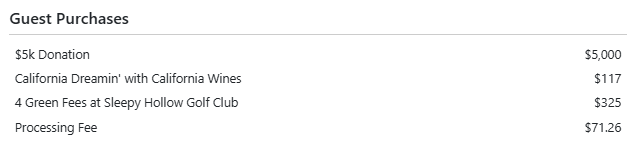
The Guest Purchases section provides a summary of the guest’s Event purchases and contributions currently assigned to their Event Statement.
This may include:
- Donations.
- Auction Items.
- Item Sales.
- Applicable fees.
This will show you the name of the Item and purchase price.
💡 Good to Know: The Guest Purchases section displays Event purchases only. Pre-Event purchases do not appear in this section. If the guest has an outstanding Pre-Event balance, hover over the Pre-event unpaid balance under Guest Payments to view a breakdown of those purchases.
Guest Payments
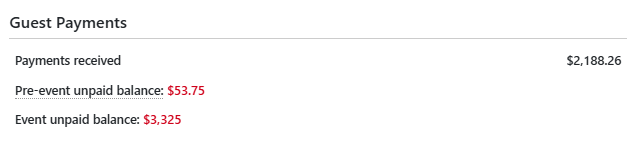
The Guest Payments section provides a quick view of the guest’s payments and balance information.
This section displays:
- Any Payments received.
- Pre-event unpaid balance.
- Event unpaid balance.
Manage Credit Cards
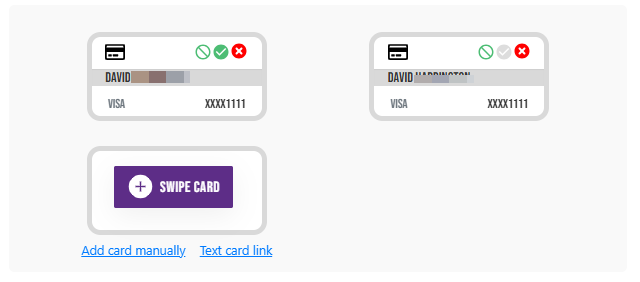
Available credit cards and card-management options are displayed at the bottom of the checkout screen.
From this section you can:
- Review cards already saved to the guest.
- Add a new credit card.
- Swipe Card.
- Add card manually.
- Text card link to the guest.
- Update a credit card when needed.
💡 Good to Know: Text card link allows the guest to enter their own credit card information from their mobile device.
⚠️ Important: Confirm that the correct credit card is selected before processing the payment.
Close Guest Check Out
When checkout is complete, click the X in the upper-right corner to close the Guest Check Out screen and return to Guests & Bidders.
⚠️ Important: Before closing checkout, confirm that all purchases have been added, the correct balances have been addressed, and any required payment has been completed.