
Adding Sponsorships & Ticket Levels

After setting up your Ticket Settings, you can create the reservation and sponsorship options for your event.
To begin, go to Reservation & Sponsorship Levels from the dashboard menu.
Add a Reservation Level
Click Add Reservation to create a new ticket level.

Enter Reservation Details
- Name: Enter the name of the ticket level
- Price: Total cost of the reservation (whether for 1 ticket or multiple tickets)
- Fair Market Value: Value of benefits included (used for tax purposes and shown on statements)
- Quantity Available: Total number available
- Sales will stop when this limit is reached
- For unlimited, enter a high number
💡 Good to Know: Tickets added manually in the dashboard will also reduce this quantity
- Include Multiple Tickets (Optional)
- Select Multiple Tickets Includes if more than one guest is included
- Enter Quantity Included (example: table of 10 or couple ticket for 2)
💡 Good to Know: If a reservation level includes multiple tickets, you can select the option to have all guests seated together by selecting the box for 'Auto Assign Table for Sponsorship Guests'.
- Description: Use the rich text box to describe what is included
- Entrées and Questions (Optional)
- Select Entrées for this level
- Select Questions to collect guest information
- Action Options
- No Longer Available – Shows but cannot be purchased
- Hidden – Removes from public view
- Allow Waitlist When Sold Out – Enables waitlist option
- Require Promo Code to Purchase – Restricts access to a code
- Limit Quantity per Purchase – Controls how many can be purchased per guest
💡 Good to Know: Promo codes apply to Reservation Levels only, not Sponsorships
Add a Sponsorship Level
Click Add Sponsorship to create a sponsorship package.

Enter Sponsorship Details
- Name: Enter the name of the sponsorship
- Price: Total cost of the sponsorship (should include any tickets included)
- Fair Market Value: Value of benefits included (used for tax purposes and shown on statements)
- Quantity Available: Total number available
💡 Good to Know: Sponsorships added manually in the dashboard will also reduce available quantity
- Include Reservations (Optional)
- Select Include Reservations with Sponsorship
- Enter Quantity Included
💡 Good to Know:
- If a reservation level includes multiple tickets, you can select the option to have all guests seated together.
- If reservations are included in this level, you can select entrée options and/or guest questions to collect additional information during registration.
- Description: Use the rich text box to describe sponsorship benefits
- Action Options
- No Longer Available
- Hidden
⚠️ Important
After a sponsorship is purchased, it will automatically be set to display on all pages.
You will need to manually adjust where the sponsor is shown.
Manage Reservation & Sponsorship Levels

Below the Add buttons, you will see:
- Top Section – Sponsorship Levels
- Bottom Section – Reservation Levels
View Level Details
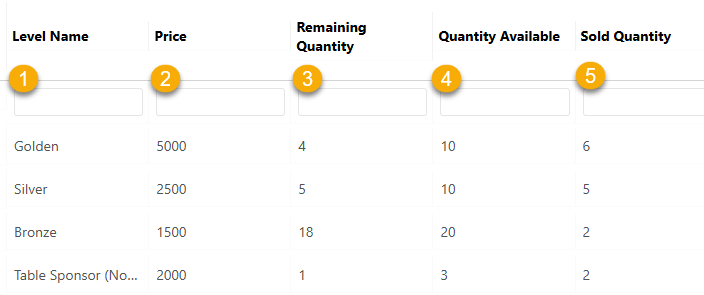
The level list provides a quick overview of each reservation and sponsorship level.
For each level, you can view:
- Level Name: The name of the reservation or sponsorship level
- Price: The cost of the level
- Remaining Quantity: How many are still available for purchase
- Quantity Available: The total number originally set for the level
- Sold Quantity: The number of levels that have already been purchased
💡 Good to Know
- Remaining Quantity is automatically calculated based on total available minus sold
- Manual additions from the dashboard are included in the sold count
- This view helps you quickly track availability and prevent overselling
Reorder Levels
- Use drag-and-drop icons to change display order
Edit a Level
- Click the Edit (pencil) icon
- The form will populate with existing details
Delete a Level
- Click the Trash icon
⚠️ Important
- If a level has already been sold, you will not be able to delete it
- Use Hidden instead
Visibility Options
- Hidden – Removes from public page
- No Longer Available – Displays but prevents purchase
💡 Good to Know
- You can update levels at any time
- Reservation and sponsorship levels are displayed separately
- Inventory is tracked across both online and manual entries
⚠️ Important
Always click Save after creating or editing a level.
Printable Quick Help Guide:
(see below for printing instructions)

How to Print This Guide
- Right-click on the image of the guide
- Select Save Image As…
- Save the file to your computer
- Open the saved image
- Click Print (or use Ctrl + P / Command + P)
💡 Good to Know
For best results, print using Full Page or Fit to Page settings to ensure proper sizing and clarity.